
This setup is based on the excellent DIY-kit named SC126, designed by Stephen C Cousins in the UK. The kit uses the enhanced Z180, which is a successor to the Z80. It is a more powerful CPU fully software compatible with the Z80 (with a few extra instructions added).
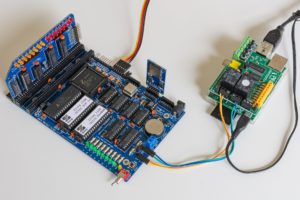
To the left you see the SC126 Z180 motherboard. I have added an SC129 Digital I/O board, also designed by Stephen C Cousins. This is the vertically inserted module with yellow and red LEDs on the top. Two ROMs are included with the SC126: Small Computer Monitor by Stephen C Cousins and RomWBW by Wayne Warthen. The RomWBW includes the CP/M operating system (and much more). Both are excellent software systems for the SC126 and freely available as open source – great effort and great work!
To the right you see a Raspberry Pi with a PiFace Digital I/O board mounted on top. The RPi is used as a frontend connecting to the serial adapter on the SC126 using the minicom terminal emulator. It runs the most recent standard Raspberry Pi OS lite, and is configured with OpenSSH server to allow access from anywhere. The wires connect two relays to the SC126; one is for the reset terminal, the other is for ROM selection. A small Python script on the RPi is used to control the relays.
Note that the RPi stuff is just additional setup by me. The SC126 is fully operational on its own. Just connect it to USB on a PC, and run a terminal emulator (e.g. TeraTerm, Putty, or minicom) to connect to the serial adapter (check your serial port settings). I prefer to use a linux PC with Ubuntu 22.04 for development. Linux has a lot of nice utilities available for working with Z80 systems, and retro-computing in general.
I also use the SC114 for the “core” Z80 experience, check out Z80 Computer SC114 and Z80 Computer SC114 with CP/M 2.2.